 en
en italiano
 čeština
 Deutsch
 français
 hrvatski
 magyar
 polski
 српски
 русский
 中文
中文 中文
中文 한국어
한국어 español
Multiple Insert
Keyboard: MINSERT
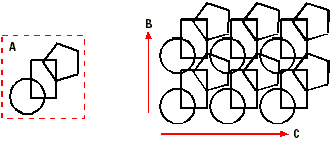
Creates a rectangular pattern from multiple copies of a block. Copies of the block are placed up and to the right from the point you specify.
- Select the insertion point for the block.
- Specify the number of rows you want inserted.
- Specify the number of columns you want inserted.
? to list blocks in drawing BROWSE EXPLORE <Block to insert> < >: Type the name of the block to insert, or press Enter to place the current block (if displayed). To list all blocks in the current drawing, choose ?. To insert a block that you have saved to disk, choose Browse. To display progeCAD.s Explorer with a list of blocks in the active drawing, choose Explore.
Multiple blocks <Insertion point for block>: Select the insertion point for the block, the default selection. To insert multiple copies of the block in a rectangular pattern, choose Multiple.
To insert a block in a rectangular pattern
Select the insertion point for the block.
Done XYZ X scale factor <1.0000>: To accept the current value for the x scale factor, press Enter. To use another value, type a number. To insert the block without changing the x,y,z scale factors, choose Done.
Y scale factor: <Equal to X scale (1.0000)>: To accept the current value for the y scale, press Enter. To use another value, type a number.
Rotation angle for block <0 >: To accept the current value for the rotation angle, press Enter. To use another value, type a number. This value sets the rotation angle of both individual blocks and an array of blocks.
Number of rows in the array <1>: Enter the number of rows of blocks to create.
Number of columns <1>: Enter the number of columns of blocks to create.
If the value for the number of rows or columns is greater than 1, the following prompts appear:
Vertical distance between rows, or spacing rectangle: Enter the distance you want between rows by typing a value or by specifying two points on the screen.
Horizontal distance between columns: Enter the distance you want between columns by typing a value or by specifying two points on the screen.
To insert multiple copies of the same rectangular pattern
Choose Multiple.
Insertion point for first block: Place the first block in the pattern by selecting a point on the screen.
Done XYZ X scale factor <1.0000>: To accept the current value for the x scale factor, press Enter. To use another value, type a number. To insert the block without changing the x,y,z scale factors, choose Done.
Number of rows in the array <1>: Enter the number of rows of blocks to create.
Number of columns <1>: Enter the number of columns of blocks to create.
If the value for the number of rows or columns is greater than 1, the following prompts appear:
Vertical distance between rows, or spacing rectangle: Enter the distance you want between rows by typing a value or by specifying two points on the screen.
Horizontal distance between columns: Enter the distance you want between columns by typing a value or by specifying two points on the screen.
Insertion point for next block: Place the next pattern of blocks by selecting a point on the screen. Another rectangular array of blocks is drawn just like the first one. Continue inserting this pattern by selecting insertion points. To end the command, right-click the mouse or press Esc.
To insert a block that was saved to disk
Choose Browse. The Insert Block dialog box is displayed. Find the block from which you want to create a rectangular pattern, and then click Open.
To use the Explorer to locate a saved block
Choose Explore. The Explorer is displayed with the Blocks group active. Double-click a block to begin placing a rectangular pattern.