 en
en italiano
 čeština
 Deutsch
 français
 hrvatski
 magyar
 polski
 српски
 русский
 中文
中文 中文
中文 한국어
한국어 español
Setting up fly-over snapping
Setting up fly-over snapping
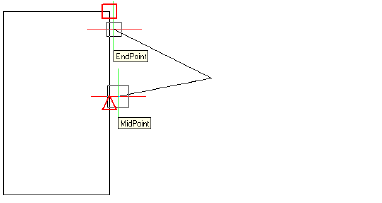
When fly-over snapping is enabled and multiple entity snaps are on, you can press Tab to cycle through the available entity snap points of the entities covered by the target box. For example, when the Endpoint and Midpoint snaps are on and the aperture box is located on a line, press Tab to cycle between the line's closest endpoint and midpoint.
To set the fly-over snapping options
1 Do one of the following to choose Drawing Settings ( ):
):
On the ribbon, choose Application button > Drawing Utilities; Home > Drawing Settings (in Utilities); or Tools > Drawing Settings (in Manage).
On the menu, choose Tools > Drawing Settings or choose Tools > Entity Snaps > Entity Snap Settings.
On the Tools toolbar, click the Drawing Settings tool.
Type dsettings and then press Enter.
2 Click the Coordinate Input tab.
3 Click the Entity Snaps tab.
4 Click Display Options. The Options dialog box opens to the Snapping tab.
5 Mark Enable Fly-Over Snapping to turn on fly-over snapping.
6 Set the fly-over options, including the color, size, and thickness of the snap marker.
7 Click OK.
8 Click OK again.
See also...