Using selection grips for editing
Using selection grips for editing
With selection grips you can quickly move, scale and rotate all selected entities. Selection grips are particularly useful for schematic drawings where precise scale or sizing is not required. In addition, this standard interface for manipulating images and objects in Windows applications, can be helpful to users who may not be familiar with precision CAD editing interfaces.
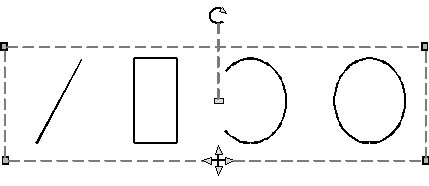
Selection grips are similar to entity grips, but they display as a single set of grips for all entities in the selection set.
The locations of selection grips are uniform for the selection set. Grips at the corners of the selection set are for scaling, the bottom center grip is for moving, the top grip is for rotating, and the center grip is for positioning the base point. When a single block is selected, additional grips appear for non-uniform scaling for all three axis.
|
|
|
Example of selection grip locations. The rotation grip is located at the top and the move grip is located at the bottom center. |
To edit using selection grips
1 Make sure selection grips are turned on. For details, see Changing grip settings.
2 Click an entity to select it and display selection grips. If you select more than one entity, a single set of selection grips displays for the entire selection set.
3 Click a grip to make it active.
4 Drag the grip to move it.

 en
en italiano
 čeština
 Deutsch
 français
 hrvatski
 magyar
 polski
 српски
 русский
 中文
中文 中文
中文 한국어
한국어 español