 en
en italiano
 čeština
 Deutsch
 français
 hrvatski
 magyar
 polski
 српски
 русский
 中文
中文 中文
中文 한국어
한국어 español
Dividing entities into segments
Dividing entities into segments
You can place markers along a selected entity, dividing that entity into a specified number of equal-length segments. You can use either a point entity or a block to mark the segments.
You can divide lines, arcs, circles, ellipses, polylines, and splines.
To divide an entity into equal segments and mark them using point entities
Advanced experience level
1 Do one of the following to choose Divide ( ):
):
On the ribbon, choose Edit > Measure (in Modify).
On the menu, choose Modify > Divide.
On the Modify toolbar, click the Divide tool.
Type divide and then press Enter.
2 Select the entity.
3 Specify the number of segments, and then press Enter.
Points on the entity might not be visible immediately.
You can change the style and size of all points in the drawing. On the Drawing Settings - Entity Creation tab, choose Points. Or type ptype in the command bar.
|
|
|
|
|
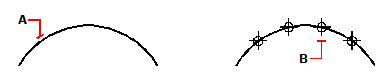
When you select the entity by pointing, divisions are marked beginning from the end closest to the point at which you select the entity (A). Blocks or point entities (B) are placed along the entity to mark it in equal intervals. |
||
To divide an entity into equal segments and mark them using blocks
Advanced experience level
1 Do one of the following to choose Measure ( ):
):
On the ribbon, choose Edit > Measure (in Modify).
On the menu, choose Modify > Divide.
On the Modify toolbar, click the Divide tool.
Type divide and then press Enter.
2 Select the entity.
3 Choose Insert Blocks.
4 Type the name of the block you want to insert as the marker.
5 Choose either Yes-Align Blocks to rotate each insertion of the block so that its vertical alignment is always perpendicular to the entity or
No-Do Not Align to insert each copy of the block with a zero rotation angle.
6 Specify the number of segments, and then press Enter.