en
en italiano
 čeština
 Deutsch
 français
 hrvatski
 magyar
 polski
 српски
 русский
 中文
中文 中文
中文 한국어
한국어 español
Creating wedges
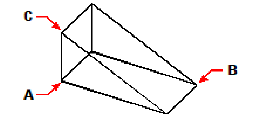
You can create three-dimensional wedges consisting of five surface planes. The base of the wedge is always parallel with the xy plane of the current UCS with the sloped face opposite the first corner. The height is always parallel with the z-axis. You position the wedge by specifying either a corner or the center of the wedge. You determine the size of the wedge by either specifying a second corner and the height; defining the wedge based on a cube having a given length; or specifying the length, width, and height.
To create a wedge as an ACIS solid
1 Do one of the following to choose Wedge ( ):
):
On the ribbon, choose Draw 3D > Wedge (in Draw 3D Solids).
On the menu, choose Draw > 3D Solids > Wedge.
On the Draw 3D Solids toolbar, click the Wedge tool.
Type wedge and then press Enter.
2 Specify the first corner of the base.
3 Specify the opposite corner of the base.
4 Specify the height.
To create a wedge as a 3D mesh
1 Do one of the following to choose Wedge ( ):
):
On the ribbon, choose Draw 3D > Wedge (in Draw 3D Meshes).
On the menu, choose Draw > 3D Meshes > Wedge.
On the Draw 3D Meshes toolbar, click the Wedge tool.
Type ai_wedge and then press Enter.
2 Specify the first corner of the base.
3 Specify the opposite corner of the base.
4 Specify the height.
|
|
|
First corner of the base (A), the opposite corner of the base (B), and the height (C). |