 en
en italiano
 čeština
 Deutsch
 français
 hrvatski
 magyar
 polski
 српски
 русский
 中文
中文 中文
中文 한국어
한국어 español
Drawing a revision cloud
Drawing a revision cloud
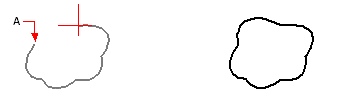
Drawing a revision cloud is easy: simply select a start point and move the mouse.
1 Do one of the following to choose Revision Cloud ( ):
):
On the ribbon, choose Home > Revision Cloud (in Annotation) or Annotate > Revision Cloud (in Markup).
On the menu, choose Draw > Revision Cloud.
On the Draw toolbar, click the Revision Cloud tool.
Type revcloud and then press Enter.
2 Specify the start point.
3 Move the mouse, encircling the desired area.
When you return to the starting point, the revision cloud command finishes automatically.
|
|
||
|
Select start point (A), then move the mouse around the desired area and back towards the start point (A). |
|
Resulting revision cloud. |
Edit revision clouds just as you would a polyline.
Select the revision cloud and move its vertices or use the Edit Polyline tool ( ) on the Modify toolbar.